
Understanding truck colours on the calendar
How truck colour appears on job blocks, and how the Trucks view gives each vehicle its own column.
Every truck has a colour, and that colour is how you read your fleet on the calendar. Where it shows up depends on the view.
Where truck colour appears
On a normal job block, the truck colour is the bottom border. The left border is the status colour. The body of the block is white.
Two colours, two meanings, two edges: status on the left, truck along the bottom. Once you have that, you can read a week without opening anything.
The block also names the truck, so colour is a shortcut rather than the only signal.
Making truck colour the background
An admin can switch Use truck color as job background on at Settings > Calendar. Blocks then fill with the truck's colour instead of showing it as a bottom border.
This is an account-wide setting, not a personal preference. Turning it on changes the calendar for everyone.
There is also Override background color with tags, which beats it — with both on, a tagged job takes its tag's colour and the truck colour goes back to being a border. If your backgrounds are not the colours you expect, that is usually why.
Multi-truck jobs
A job can have several trucks, but the block only shows the primary truck's colour. You cannot tell a two-truck job from a one-truck job by colour alone — open it, or use the Trucks view, where it appears in every assigned truck's column.
The Trucks view
This is the view where each vehicle genuinely gets its own column.
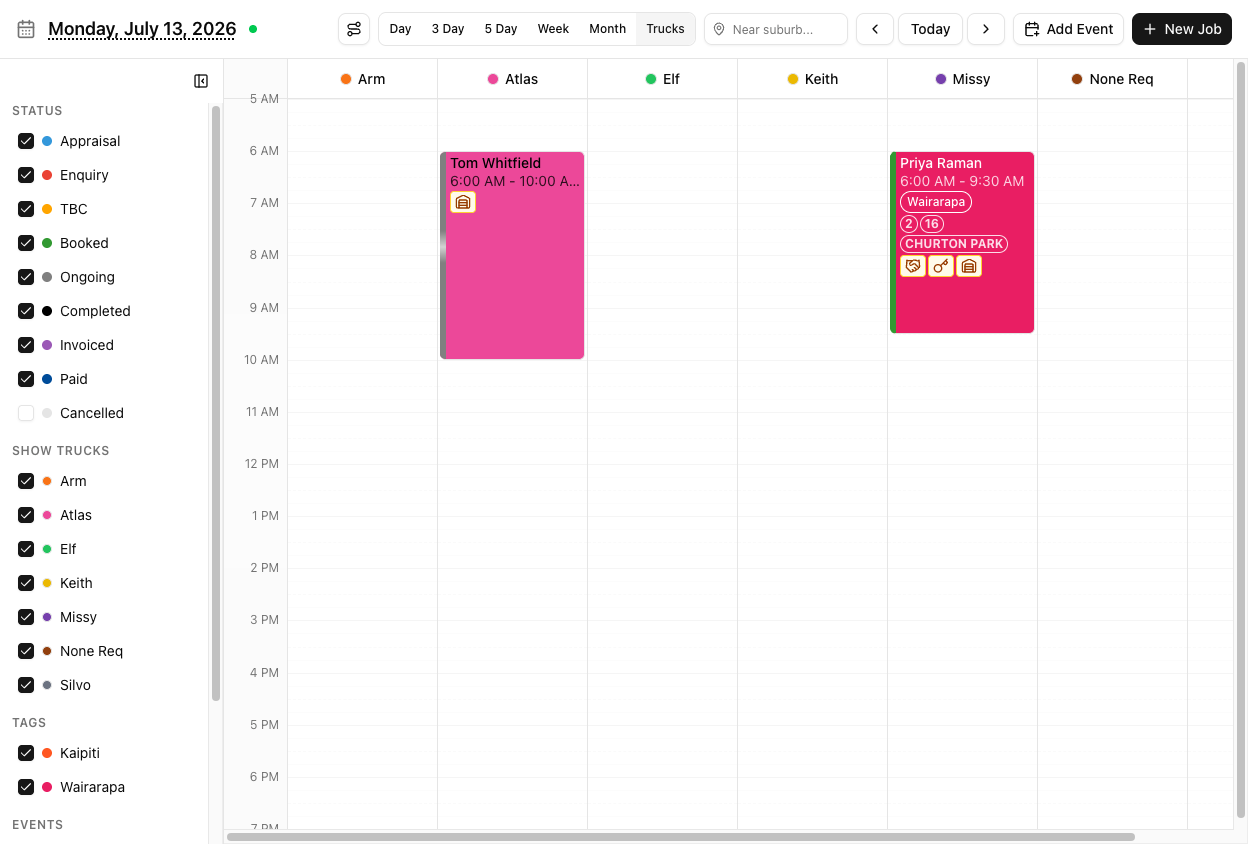
Each column is headed by the truck's colour dot and name. It shows one day — the arrows step a day at a time, not a week.
Calendar events are not shown in the Trucks view, even events assigned to a truck. If you use events to mark a truck out for servicing, that column will look free here.
The sidebar's truck list is headed Show Trucks in this view. Untick everything and you get "No trucks visible — enable trucks in the Show Trucks filter."
Choosing colours
Truck colours are set at Fleet > Trucks — twelve presets plus a custom hex picker.
Nothing stops two trucks having the same colour. VanMan will not warn you, and duplicates make the calendar meaningfully harder to read. Check the fleet list when you add a truck.
Events use a separate 15-colour palette with no custom hex.
Tutorial: make your fleet readable at a glance
Six trucks, and nobody can tell them apart on the calendar.
Go to Fleet > Trucks. The Color column shows every truck's colour in one place — the fastest way to spot two that are too close.
If two trucks are orange and red, edit one. Open the ⋯ menu → edit, and pick from the twelve presets — reach across the palette rather than one step along it. Red and orange are adjacent; red and teal are not.
Nothing warns you about duplicates, so this check is yours to make.
Whichever vehicle runs most should be the most distinct. You will be picking it out of a crowded week more often than the others.
Open the Calendar on a busy week. Truck colours are the bottom border of each block — thin by design, because the left border is carrying status.
If you cannot tell them apart at this size, the colours are still too close. Go back and change them.
If your team cares more about "which truck" than "which status", an admin can switch on Use truck color as job background at Settings > Calendar. Blocks fill with truck colour.
Think before you do: it is account-wide, and you are trading away the at-a-glance read on status. A dispatcher wants trucks; an owner chasing TBC jobs wants status. You cannot have both as the background.
If you turned backgrounds on and blocks are still the wrong colour, look for Override background color with tags. Tag colours beat truck colours — one setting is quietly cancelling the other.
For "what is each truck doing tomorrow?", switch to Trucks. Colour matters much less here — every vehicle has its own column, so you read position instead.
Just remember it is one day, and events do not appear.